Picnic Potato Salad (German Style)

German potato salad

There are many different variations of German potato salad, most are served warm and feature the same basic ingredients. I created this one from a basic recipe and a few tweaks I’ve tried over the years. I usually make this on the morning of our annual family reunion picnic (for a bunch of Germans!) and serve it warm, but it’s also very good cold and is pretty hearty – in case you’re traveling. If you’re serving a large group, I recommend making a double batch, but do it one portion at a time, and you’ll need a very large bowl to toss everything together in.


German Potato Salad

5 lbs. of medium-sized red or Yukon Gold potatoes, cleaned & cubed

1 lb. bacon, cut into small pieces

1-1/2 lbs. smoked or German-style sausage, cut into pieces or slices

1/2 or 1 large sweet onion, finely chopped

2/3 c. apple cider vinegar

3 T. bacon grease

2 tsp. celery salt (or 1-2 stalks of celery, finely chopped)

2 T. flour

1/4 c. sugar

1-1/3 c. water

1 tsp. dijon mustard

salt & pepper to taste

2 T. fresh chopped dill (optional)

1 fennel root, chopped finely (optional)

IMG_2922In a large pot, cover the chopped potatoes with salted cold water. Cover and bring to a boil. Cook until potatoes are slightly tender, but don’t overcook. At the same time, saute the sausage slices in a large saucepan until browned. Drain and place in a large bowl. Drain the potatoes and add to the sausage in bowl when ready.

Cook the bacon pieces in the large saucepan until crisp. Drain off the grease and set aside 3 T. Saute the onion (and celery if you choose) in it until tender. Stir in the flour, salt, pepper, celery salt and stir well. Add the sugar, water, vinegar, bring to a boil, then boil 2 minutes or until thickened slightly. Stir in the mustard and pour over the potatoes, sausage, bacon and chopped fennel root in the large bowl. Add the fresh dill and toss until well coated. Serve warm. If you decide to serve cold later, cover and refrigerate. Toss before serving, and add a few dashes of the vinegar to moisten if needed. Makes 12-14 servings.

Quesokopita with Cilantro Pesto

One of the reasons I started my website cookingwithkristy.com was because I wanted to see if I could re-create delicious food I had eaten in restaurants without being a full-fledged chef. I decided to extend this idea when my husband recently brought home what looked like a quesadilla from the store along with three different kinds of dips for it. It really was a flat version of Spanakopita, which is a savory, Greek, layered dish made with spinach, feta cheese and pastry crust. I’ve also had this in many restaurants, but it often lacks flavor and is less than savory.

After following the instructions to cook the spinach “quesadilla” (which basically was only reheating it), and sampling it with each of the three dips, I found my favorite combination and challenged myself to try and cook something even better. I searched the web – there are a million different recipes for spanakopita and pesto, so I just picked out all my favorite ingredients and seasonings, simplified the cooking and assembly, and came up with the recipe below. Although it doesn’t look like what came home from the grocery store, it can be eaten with no utensils and tastes MUCH better! I even gave it a new name based on my dear love of quesadillas, and now Spanakopita!

To save time while making this, you can make the pesto the night before and refrigerate, or make it first and just set aside for serving. You can also chop the garlic, leeks and herbs prior.

Quesokopitas With Cilantro Pesto

1 lb. package of fresh spinach

2 T. olive oil

1 leek

2-4 cloves of garlic

¾ oz. package of fresh mint, leaves separated from stems

¾ oz. package of fresh dill, with the thick stems removed

6 oz. crumbled feta cheese

2 eggs, beaten

16 oz. package frozen filo or phyllo dough (found in freezer section near the desserts)

salt & pepper to taste

spray olive oil

nutmeg

Take out one roll of filo dough & follow directions on package for defrosting & bringing to room temperature. Clean the leek, cut off & discard the dark leafy parts. Cut the rest in chunks & put in a food processor with the garlic or chop finely. In a very large frying pan, heat the olive oil & sauté the leeks & garlic until soft, about 4-5 minutes. Add in the spinach, a couple of handfuls at a time, cooking & tossing with tongs until it’s wilted down & dark green. Remove from the pan & put in a colander over a bowl. Press out the excess liquid & let cool.

In the meantime, put the dill & mint in a food processor. Pulse until finely chopped. Add to the cooled spinach mixture, along with the feta, eggs, salt & pepper. Stir until well mixed and set aside.

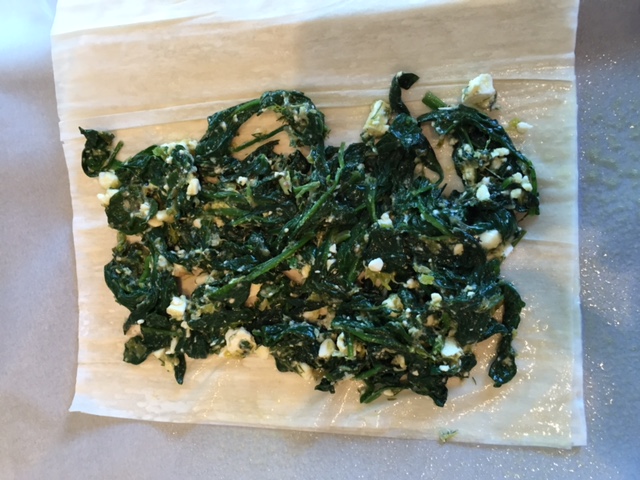
Line two cookie sheets with a piece of parchment paper. Open the package of filo and take two sheets of it. Spray with olive oil, put on the cookie sheet, and repeat 4 times until there are 8 layers. Put some of the spinach filling on half of the filo and fold over the rest. Spray the top with more olive oil and sprinkle with nutmeg. Repeat until there are four “quesokopitas.” Bake at 350 degrees for 25-30 minutes until lightly browned and flaky. Remove, cool slightly, and cut each into quarters. Serve while warm with the Cilantro Pesto (or plain).

dill + mintspinach mixturespinach mixture spread on filoQuesokopita with Cilantro Pesto

Cilantro Pesto

4 bunches of fresh cilantro

¾ c. olive oil

1 c. pumpkin seeds (pepitas)

1 c. shredded 3-cheese Italian mix (Parmesan/Asiago/Romano)

Juice from 3 fresh limes

3 cloves of garlic, crushed

salt & pepper to taste

Microwave the pumpkin seeds in a glass bowl for 2 minutes on high to toast them. Toss or stir, then microwave again another 2-3 minutes until lightly toasted. Cut the majority of stems off the bunches of cilantro & put into food processor (if your processor is smaller, you may need to only put in half the cilantro at first). Add the pepitas & remaining ingredients & process until smooth. Add the rest of the cilantro if necessary & more salt & pepper or lime juice to taste.

Note: This recipe makes a decent sized batch. You can freeze extra easily and use later tossed in hot pasta or with rice. This pesto is delicious on spanokopita, with any traditional pasta or ravioli, or just on toasted bread. Try it with other nuts such as almonds, pine nuts, or walnuts.

 Cilanto, pepitas and cheeseIMG_1974IMG_1984


Baked Arancini

A few years ago, I met a friend for happy hour at a Portland restaurant that served arancini. I had never had it or even heard of it, but I immediately fell in love with those little fried balls of risotto. Arancini is said to mean “little oranges” in Italian and originated in Sicily. I’ve tried them at a few different places and vowed to try making them myself someday. I even asked my mom who is part Italian if she ever had them or possessed some ancient family secret recipe, but she had not and did not.

So while planning an upcoming trip to Italy which includes a stop at the world’s fair Expo Milano 2015 – ironically advertised with the theme “Food is Life!” – I also started researching different arancini recipes just to see how common they were and different variations. Although they are traditionally fried, I didn’t want the mess so I baked them in the oven. They turned out just as delicious and lighter tasting than the heavier fried version. They do take a little bit of time, but it’s a great way to use up leftover risotto if you have any. Buon appetito!

Mushroom Risotto

(3) 14-oz cans low-sodium chicken broth

1 oz. dried mushrooms (a mix of porcini, crimini, shiitake, and oyster is delicious), cut into small pieces OR 2 c. finely chopped fresh mushrooms

1 large shallot, finely chopped

1 tsp. finely chopped garlic

1 T. olive oil

1 c. uncooked arborio rice

1/2 c. dry white wine such as chardonnay

1/2 c. fresh grated 3-cheese blend (parmesan, romano, asiago)

freshly chopped basil and/or thyme to taste

sea salt & fresh ground pepper to taste

Put the rice in a strainer over a large glass bowl or measuring cup. Pour the broth over the rice to rinse the starch off. Microwave the broth 2-3 minutes until hot, then add in the mushrooms (if using dehydrated ones) and set aside.

In a large deep frying pan, heat the olive oil, onion & garlic over medium heat until soft and slightly browned, stirring frequently. Carefully add in the rice (watch out for popping!) and wine. Cook it 2 minutes, stirring continuously, then reduce heat to medium. Strain the mushrooms out of the broth and set them aside.

Gradually add the broth to the rice mixture, 1/2 cup a time until it is absorbed each time and before adding more. With the last portion, add in the asparagus and mushroom pieces. Cover and cook 8 minutes, stirring occasionally to keep from sticking. When all the liquid is absorbed and mushrooms are tender, remove from heat. Stir in the cheese, and salt and pepper to taste. Spread in a shallow dish and refrigerate until cooled. Can make this the day before making the arancini.

Arancini

Risotto (recipe above or your own favorite version)

1-1/2 c. Italian style Panko bread crumbs

3 eggs, lightly beaten

1-1/2 c. flour

Spray olive oil

Fresh mozzarella, cut into 1/2″ cubes

Marinara sauce

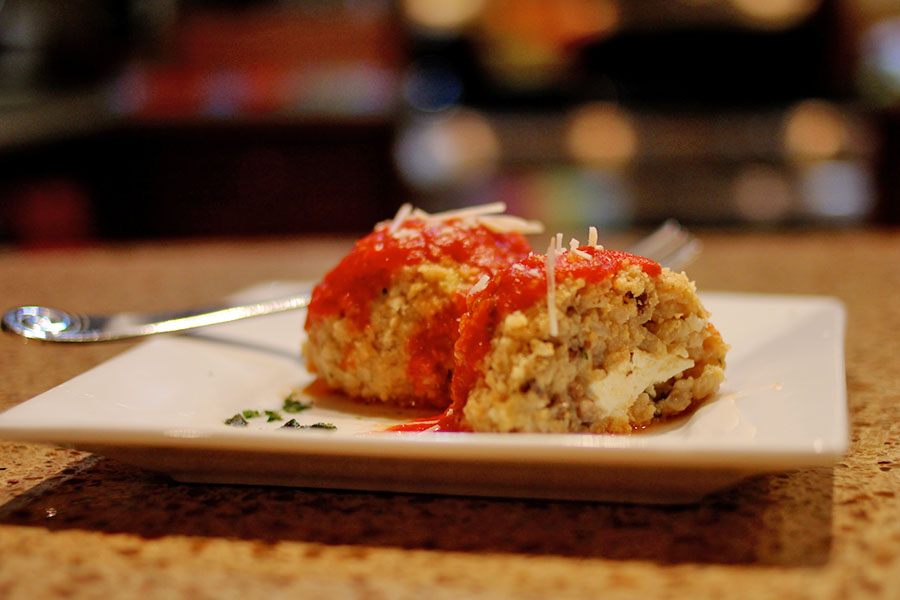
Line 2 cookie sheets or baking pans with parchment paper and preheat oven to 350 degrees. Place the panko, beaten egg and flour all into separate shallow bowls. If being served as a main dish, use an ice cream scoop for approximately 3″ rounds. If being served as an appetizer, then a smaller scoop will make approximately 2″ rounds. Wet your hands with cold water or use gloves, then form the chilled risotto into small balls with a piece of mozzarella in the center. Roll in the flour, then the egg, then the panko, being sure to coat the entire piece and set on the baking sheet. Repeat until you’ve used all the risotto. Spray the arancini with the olive oil spray and bake approximately 20 minutes or until crispy. Warm up the marinara sauce and drizzle over the arancini just before serving.

If you love these and want a few more variations to try, click here.

arancini IMG_4984


Sunday Crockpot Baked Beans

1 lb. lean ground beef

1 c. chopped onions

3/4 – 1 lb. bacon, cut into small pieces

In a medium frying pan, cook the ground beef and onion together until browned. Drain off oil and put into large crockpot. In the same pan, cook the bacon until tender. Drain off grease and put in pot as well.

Add to the meat mixture:

(1) 15.5 oz can each of – garbanzo beans, lima beans, black beans, kidney beans (all drained & rinsed)

(2) 15.5 oz cans pork & beans

1 c. ketchup

1/4 c. brown sugar

1 T. chili powder (or to taste)

1 T. liquid smoke

3 T. vinegar

1 t. salt

dash of black pepper

Mix together and cook on low approximately 6-8 hours. Can substitute various types of beans if you have them. This recipe is great for using whatever you have in the cupboard!


Hazelnut Chip Cookies

I took my usual chocolate chip cookie recipe and “Oregon-ized” it with hazelnuts, hazelnut flavoring and toffee bits. Delicious!

Hazelnut Chip Cookies

3/4 c. butter flavored shortening

1-1/4 c. brown sugar

2 T. milk

1 T. hazelnut flavoring

1 egg

1-3/4 c. flour

3/4 t. baking soda

8 oz package of Heath toffee bits

1 c. chopped hazelnuts

Combine shortening, sugar, milk and flavoring. Beat at medium speed until creamy, then add in egg and mix well. Add in flour, soda and mix slowly until well blended. Add in the chips and nuts. Scoop into large tablespoon-sized balls onto ungreased sheet and back at 375 degrees for 10-12 minutes. Cool on sheet 2 minutes then move to rack to finish cooling.

Note: if you have a KitchenAid mixer, throw in all of the ingredients at once except chips and nuts. Blend until smooth, then add in the chips & nuts at the end. Easy! I’ve also made the dough ahead of time, scooped into balls, and refrigerated or froze them until I’m ready to bake. Just bake them a few minutes longer. I also recommend baking on parchment paper for quick cleanup!

Hazelnut chip cookies

Hearty Lentil Soup

Who doesn’t love a quick and easy soup when cold weather sets in? I found this lentil soup recipe from a now-defunct restaurant in my stash of old newspaper clippings – dated from 2001…ok, so I need to clean things out a little more often! I loved this soup at the restaurant and when I made it last 13 years ago. I thought I’d try it again and give it an update. So I dug out my crockpot to see if I could make it in fewer steps, and I looked around my kitchen for some new ingredients to add (like the nearly overripe tomatoes on the counter). Voila! It turned out perfect! I added my crazy cheese bread and it was a hearty, toasty and tasty supper – plus, the leftovers were perfect for lunch the next day.  Maybe if that restaurant had added a few extra garden-fresh ingredients, they would still be around!

Hearty Lentil Soup

1 T. butter

1 T. extra virgin olive oil

1 lb. Italian sausage links

1 c. shredded carrot

1/2 c. diced onion

1/4 cup finely chopped leeks

1/4 c. finely chopped celery

1-1/2 c. uncooked lentils

4 c. low-sodium chicken broth

8-10 fresh, ripe Roma tomatoes, cubed

1 c. whipping cream

2 T. dijon mustard

1 T. red wine vinegar

1 c. finely chopped fresh spinach

salt & pepper, grated parmesan cheese to taste

In a large skillet, heat the butter and olive oil until melted over medium heat. Brown the sausage links on all sides, about 5 minutes or until cooked through. Remove sausages, set aside and cool. Add the carrot, onion, leeks, and celery to the remaining oil and cook until tender.

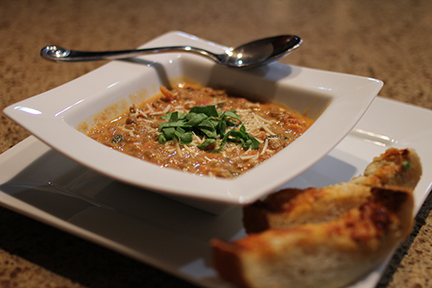
In the crockpot, mix the lentils, broth, cooked vegetables, tomatoes, chopped sausage pieces, and dijon. Cover and cook on high for 2-1/2 to 3 hours, until lentils are cooked thoroughly. Add the vinegar, cream, salt & pepper, and 3/4 of the spinach. Stir, cover and cook 5 more minutes. Serve in soup mugs sprinkled with the remaining spinach and parmesan.

If you’re daring, try this with spicy Italian sausage for some real heat!

lentil soup

Goat Cheese Stuffed Salmon

When I first started my cooking site, I chose the tagline “I can make that!” because it’s something I often said when dining out, watching The Food Channel, and reading through magazines. I would enjoy something amazing and think to myself, “I can make this at home, but maybe add a little more of this and a little less of that and make it perfect for my taste.” Fast forward and here we have goat cheese stuffed salmon, inspired from a dish I had on my honeymoon a few years ago that combined layers of smoked salmon, goat cheese, herbs and olive oil as an appetizer served with crackers. I combined the same basic flavors and turned it into an easy main dish instead. You can even make the stuffing and spread ahead of time, then just assemble and cook on a busy spring night after work.

Goat Cheese Stuffed Salmon

Stuffing:

• 8 oz goat cheese

• 1-2 T. milk or cream

• 2 t. fresh chopped herbs (dill, tarragon, cilantro, lemon basil or your favorite)

• Salt & pepper to taste

Combine all of the above ingredients in a food processor until fluffy and smooth. Set aside,

Spread:

• 2 T. spicy or stone ground mustard

• 1 T. mayo

Combine until smooth, set aside.

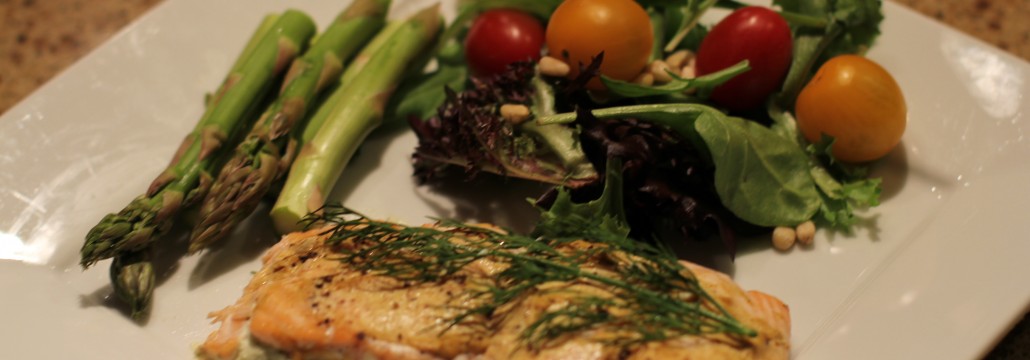
Take 2 lbs. of fresh salmon and cut into smaller portions. If the slices are thick enough, slit the middle and stuff with the goat cheese filling. If the slices are thinner or odd shaped, fold them over the stuffing (secure with toothpick if necessary). Spread the mustard mixture on top, sprinkle with salt and pepper. Bake in large glass dish at 350 degrees for 25 minutes or until the fish is still moist and flaky. Garnish with more fresh chopped herbs and serve with rice or grilled vegetables.

Try the stuffing with different cheeses, or in different fish (halibut or tuna).

These fillets are even good chilled as a sandwich the next day. I do love leftovers!


Tea-Infused Chocolate Truffles

Perfect for Valentine’s Day, and so easy! I tried these out on a very gracious audience today at the Bauman Farms ladies tea and I think they liked them. Not too many leftovers. The only bad thing is that I forgot to take a photo!

Tea-Infused Chocolate Truffles

(2) 4-oz bittersweet chocolate bars (chopped into small bits)

(2) 4-oz semi-sweet chocolate bars (chopped)

2/3 cup heavy whipping cream

4 tea bags (spiced cinnamon chai, vanilla caramel or other favorite flavors)

Unsweetened cocoa powder, cinnamon and/or toasted ground toasted almonds

 In a small saucepan, bring the cream just to a boil over medium-high heat. Remove from heat and put in the tea bags. Cover and brew 5-8 minutes. Remove the tea bags and squeeze out excess cream.

In a medium-sized microwave safe bowl, pour the cream mixture over the chocolate bits and stir. Microwave on high for 40 seconds. Stir and if it’s not smooth, microwave 10-20 seconds more if needed. Refrigerate 1 hour or until firm.

Scoop the chocolate “dough” by level tablespoonfuls and roll into balls. Roll in the cocoa powder with a bit of cinnamon, and/or nuts. Store in airtight container in refrigerator. Serve chilled or slightly below room temperature. Can also be frozen up to 2 weeks.

Notes:

• Try berry or fruit flavored teas!

• If you prefer a stronger flavor, use more tea bags.

• Use cinnamon or vanilla powder mixed with the cocoa powder depending on the tea flavor you use.

Taco Soup

No-Fail Taco Soup

There are so many delicious and convenient soups available now that it’s hard to justify taking the time to make it at home. The perks of making it yourself are that you can make enough to feed the family, take leftovers to work all week, AND probably still have enough to freeze and eat months later when you don’t feel like cooking! You can also season it to your own liking – many of the store-bought varieties are too high in sodium for my taste.

When you make soup at home, you can also add, leave out, or substitute ingredients easily. Below is my version of what we called “taco soup” growing up. It seems like everyone has their own favorite recipe, and if you look online, there are infinite ways to switch it up. I began calling this my “No-Fail Taco Soup” because it’s a basic recipe where you really can use whatever is in your cupboard or freezer, in whatever portions, season to your own tastebuds, add toppings afterward to flavor it even more, and it always turns out tasty!

No-Fail Taco Soup

1-1/2 lbs. ground meat (beef, turkey, chicken or a combination)

1 package of taco seasoning mix

1/2 or whole large yellow onion, peeled and chopped

(3) 14.5 oz cans diced tomatoes

(2) 11 oz cans of southwestern style corn

(4) 15 oz. cans of beans (I prefer black, garbanzo, white, and kidney but you can also use pinto or all the same type)

1 T. cocoa powder

1 c. water or broth

In large skillet, brown the ground meat and drain off liquid and fat. Return to skillet and add taco season per the directions on packet.

Pour all the beans into a strainer and rinse off. Transfer beans to a large slow cooker and add the cans of corn and tomatoes with their liquid. Add in the cocoa, water or broth, and ground meat mixture. Stir and cook on low for 4-6 hours.

Serve warm and top with crunched up taco chips, sour cream, grated cheese, chopped onions, cilantro, hot sauce and salt or pepper to taste (I usually leave out the additional salt since the taco chips and cheese have enough).

Notes:

• If you like your soups peppier, add in a bit of ground chipotle in adobo sauce or a cube of chipotle powder, Tabasco or chili powder. Ground cumin adds a bit more authentic Mexican flavor.

• Try it with cubed beef stew meat, chorizo, or go vegan and add in chopped carrots and more tomatoes (add the taco seasoning in with the beans, and water or broth).

• To make a creamier version, add in a can of refried beans with 1-2 cans more water to your desired consistency, and/or a can of tomato sauce.

• Serve on top of baked potatoes with a bit of shredded cheddar and sour cream or with a chunk of cornbread on the side for a hearty dinner.

• You can also simmer this on your stovetop in a large soup kettle. All the ingredients are already cooked and you only need to heat it until hot, but the longer it simmers, the more the flavors meld together and the better it tastes!