Sunday Supper Roasted Chicken

I’m discovering that as life gets busier, it gets harder to make time for the simple things such as sitting down to a nice family dinner. I enjoy nice home cooking, but rarely have the luxury of time during the week, so I try to do bigger meals on the weekends and hope for leftovers.

Here’s an easy favorite to throw in the oven and let cook while you do other things. The recipe below is a combination of a few favorites, and I use different herbs almost every time, depending on what I have in the kitchen. Try your own combinations, you won’t go wrong. The best part is that your house will smell amazing and you can tell all your guests that it’s your secret recipe! Try pairing it with oven-roasted Brussels sprouts that you can cook at the same time. The roasting process makes the flavor of the sprouts very mild. Even my mom, the biggest vegetable pusher (who ironically hates Brussels sprouts) ate them!

Sunday Supper Roasted Chicken

(1) 5-6 lb. whole roasted chicken

1 large lemon, sliced

1 t. dried parsley, sage, or thyme

1 large fennel bulb OR medium onion, cut into eighths

Several sprigs of fresh rosemary or fresh sage leaves, rinsed well

1 T. butter, melted

1 T. olive oil

Salt and pepper

Preheat oven to 425 degrees. Discard the neck and giblets from inside the chicken and rinse it thoroughly in cold water, including inside the cavity. Dry it with paper towels and place on cutting board to prep. On the breast side, loosen the skin from the meat and slip in a few of the lemon slices, dried parsley/sage/thyme and/or sprigs of rosemary. Put half of the fennel bulb or onion chunks in the cavity, along with the remaining lemon and fresh rosemary or sage. Place the chicken in a roasting pan, breast side down. Mix the melted butter and olive oil together and brush over entire bird. Sprinkle with salt and pepper and put the remaining fennel/onion and herbs around the chicken in the pan.

Put pan in oven, uncovered, and bake for 1-1/2 to 2 hours. Baste with juices every ½ hour. The chicken is done when it’s tender and meat thermometer reads 180-185 degrees in the thickest part of the breast or thigh. If chicken looks too brown partway through, cover lightly with foil. Remove lemons from cavity and let sit covered for 5-10 minutes before carving and serving with the fennel and onions. Serves 4-6.

FullSizeRender

Autumn Clam Chowder

When fall arrives along with football and cold & flu season, there’s nothing better than a cup of hot chowder. I have tried many different potato soup, clam chowder and other hearty recipes, and settled on this combination as my favorite – it has the best of all flavors and it’s easy to spice it up more or less to your personal tastes. I happened to have a fresh crab for the last pot, so I added the meat in at the last minute for a bit of extra seafood flavor.

Autumn Clam Chowder

(2) 6.5 oz. cans of minced clams

3-4 slices of bacon, cut in half

3-4 medium potatoes, cubed

1 med. onion, chopped

1 t. chicken bouillon

2 t. Worcestershire sauce

1/2 t. dried, crushed thyme

(1) 15-oz can fire roasted or southwestern style  corn, drained

1 fire-roasted red pepper, chopped

2-4 T. jalapeno peppers (jarred), chopped

salt & pepper to taste

2 c. milk

1 c. half-and-half

2 T. all-purpose flour

Strain the clams into a measuring cup, saving the juice. Set the clams aside and add water to the juice until it equals 1 cup, then set aside. In a large pot, cook the bacon until crisp. Remove and drain on paper towels. To the bacon drippings, add the onions and cook few minutes until soft. Add the clam juice, potatoes, thyme, bouillon, Worcestershire sauce, salt and pepper. Bring to boiling, then cover, reduce heat and simmer until the potatoes are soft. Mash them lightly.

Whisk together the milk, half-and-half, and flour. Add to the potato mixture and increase heat back to medium. Cook and stir often until slightly thickened and near boiling. Stir in the clams, jalapenos, red pepper, clams, crumbled bacon and corn. Bring the mixture back up to boiling and until everything is heated thoroughly. Serve in large mugs or bowls, sprinkled with more chopped peppers or shredded cheddar cheese if desired.

Autumn Clam Chowder 2

Root Beer BBQ Sauce

Every so often, I find myself searching for recipes to use up random things that are in my refrigerator or cupboard (is it just me?!). This time, it was root beer. I bought 2 liter bottles for summertime root beer floats when I had friends visiting recently. We used about half of one bottle, and a week later, suddenly there were two opened bottles in the fridge. Still not sure why, but that’s for a different article.

I remembered seeing recipes over the years for spare ribs and BBQ pork made in a crockpot with cola or root beer. I found many variations for Root Beer BBQ sauce online, and combined a few to make my own. I also added in a few more ingredients for my own taste (and to use up even more random findings, like tomato sauce from last year’s garden since the new crop is almost ready…!). This recipe is easy but does take awhile to cook, but it doesn’t take much attention, so it’s easy to have on the stove while you’re doing other fun summertime things.

Root Beer BBQ Sauce

2-liter bottle of root beer (not diet)

1 c. red wine or apple cider vinegar

1 c. tomato sauce

½ c. ketchup

½ cup mustard (regular yellow or deli style)

2 T. Worcestershire sauce

1 T. hot sauce

2 T. molasses

2 T. brown sugar

juice from ½ lemon

1 t. each kosher salt and ground black pepper

1 can tomato paste

1 t. liquid smoke

3 T. cold butter

In a large pot, boil the root beer down until it’s about 1-1/2 cups and more concentrated, about an hour. Add in the remaining ingredients and simmer for another 45 minutes or hour until it’s slightly thickened and the acidic vinegar taste is cooked out. Add in the liquid smoke and butter at the end to finish it off. Serve with your favorite summer grilled meat. Note: any ingredients or measurements in this can be changed to suit your individual taste. For example, more tomato paste for a thicker sauce, less vinegar for less tang, or more brown sugar and liquid smoke for sweeter, smokier flavors, and of course more or less salt & pepper.

Picnic Potato Salad (German Style)

German potato salad

There are many different variations of German potato salad, most are served warm and feature the same basic ingredients. I created this one from a basic recipe and a few tweaks I’ve tried over the years. I usually make this on the morning of our annual family reunion picnic (for a bunch of Germans!) and serve it warm, but it’s also very good cold and is pretty hearty – in case you’re traveling. If you’re serving a large group, I recommend making a double batch, but do it one portion at a time, and you’ll need a very large bowl to toss everything together in.


German Potato Salad

5 lbs. of medium-sized red or Yukon Gold potatoes, cleaned & cubed

1 lb. bacon, cut into small pieces

1-1/2 lbs. smoked or German-style sausage, cut into pieces or slices

1/2 or 1 large sweet onion, finely chopped

2/3 c. apple cider vinegar

3 T. bacon grease

2 tsp. celery salt (or 1-2 stalks of celery, finely chopped)

2 T. flour

1/4 c. sugar

1-1/3 c. water

1 tsp. dijon mustard

salt & pepper to taste

2 T. fresh chopped dill (optional)

1 fennel root, chopped finely (optional)

IMG_2922In a large pot, cover the chopped potatoes with salted cold water. Cover and bring to a boil. Cook until potatoes are slightly tender, but don’t overcook. At the same time, saute the sausage slices in a large saucepan until browned. Drain and place in a large bowl. Drain the potatoes and add to the sausage in bowl when ready.

Cook the bacon pieces in the large saucepan until crisp. Drain off the grease and set aside 3 T. Saute the onion (and celery if you choose) in it until tender. Stir in the flour, salt, pepper, celery salt and stir well. Add the sugar, water, vinegar, bring to a boil, then boil 2 minutes or until thickened slightly. Stir in the mustard and pour over the potatoes, sausage, bacon and chopped fennel root in the large bowl. Add the fresh dill and toss until well coated. Serve warm. If you decide to serve cold later, cover and refrigerate. Toss before serving, and add a few dashes of the vinegar to moisten if needed. Makes 12-14 servings.

Quesokopita with Cilantro Pesto

One of the reasons I started my website cookingwithkristy.com was because I wanted to see if I could re-create delicious food I had eaten in restaurants without being a full-fledged chef. I decided to extend this idea when my husband recently brought home what looked like a quesadilla from the store along with three different kinds of dips for it. It really was a flat version of Spanakopita, which is a savory, Greek, layered dish made with spinach, feta cheese and pastry crust. I’ve also had this in many restaurants, but it often lacks flavor and is less than savory.

After following the instructions to cook the spinach “quesadilla” (which basically was only reheating it), and sampling it with each of the three dips, I found my favorite combination and challenged myself to try and cook something even better. I searched the web – there are a million different recipes for spanakopita and pesto, so I just picked out all my favorite ingredients and seasonings, simplified the cooking and assembly, and came up with the recipe below. Although it doesn’t look like what came home from the grocery store, it can be eaten with no utensils and tastes MUCH better! I even gave it a new name based on my dear love of quesadillas, and now Spanakopita!

To save time while making this, you can make the pesto the night before and refrigerate, or make it first and just set aside for serving. You can also chop the garlic, leeks and herbs prior.

Quesokopitas With Cilantro Pesto

1 lb. package of fresh spinach

2 T. olive oil

1 leek

2-4 cloves of garlic

¾ oz. package of fresh mint, leaves separated from stems

¾ oz. package of fresh dill, with the thick stems removed

6 oz. crumbled feta cheese

2 eggs, beaten

16 oz. package frozen filo or phyllo dough (found in freezer section near the desserts)

salt & pepper to taste

spray olive oil

nutmeg

Take out one roll of filo dough & follow directions on package for defrosting & bringing to room temperature. Clean the leek, cut off & discard the dark leafy parts. Cut the rest in chunks & put in a food processor with the garlic or chop finely. In a very large frying pan, heat the olive oil & sauté the leeks & garlic until soft, about 4-5 minutes. Add in the spinach, a couple of handfuls at a time, cooking & tossing with tongs until it’s wilted down & dark green. Remove from the pan & put in a colander over a bowl. Press out the excess liquid & let cool.

In the meantime, put the dill & mint in a food processor. Pulse until finely chopped. Add to the cooled spinach mixture, along with the feta, eggs, salt & pepper. Stir until well mixed and set aside.

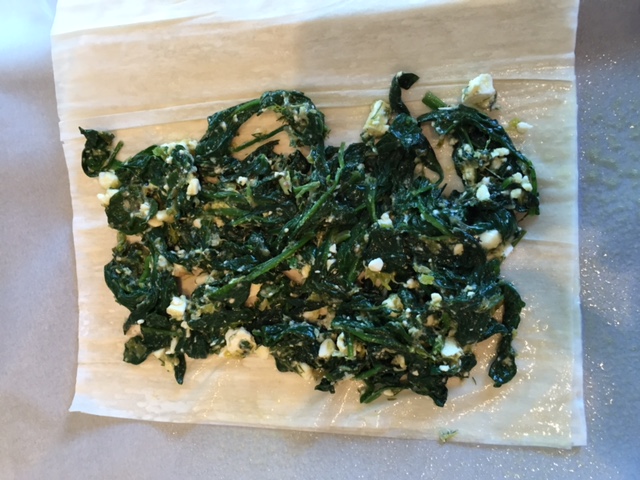
Line two cookie sheets with a piece of parchment paper. Open the package of filo and take two sheets of it. Spray with olive oil, put on the cookie sheet, and repeat 4 times until there are 8 layers. Put some of the spinach filling on half of the filo and fold over the rest. Spray the top with more olive oil and sprinkle with nutmeg. Repeat until there are four “quesokopitas.” Bake at 350 degrees for 25-30 minutes until lightly browned and flaky. Remove, cool slightly, and cut each into quarters. Serve while warm with the Cilantro Pesto (or plain).

dill + mintspinach mixturespinach mixture spread on filoQuesokopita with Cilantro Pesto

Cilantro Pesto

4 bunches of fresh cilantro

¾ c. olive oil

1 c. pumpkin seeds (pepitas)

1 c. shredded 3-cheese Italian mix (Parmesan/Asiago/Romano)

Juice from 3 fresh limes

3 cloves of garlic, crushed

salt & pepper to taste

Microwave the pumpkin seeds in a glass bowl for 2 minutes on high to toast them. Toss or stir, then microwave again another 2-3 minutes until lightly toasted. Cut the majority of stems off the bunches of cilantro & put into food processor (if your processor is smaller, you may need to only put in half the cilantro at first). Add the pepitas & remaining ingredients & process until smooth. Add the rest of the cilantro if necessary & more salt & pepper or lime juice to taste.

Note: This recipe makes a decent sized batch. You can freeze extra easily and use later tossed in hot pasta or with rice. This pesto is delicious on spanokopita, with any traditional pasta or ravioli, or just on toasted bread. Try it with other nuts such as almonds, pine nuts, or walnuts.

 Cilanto, pepitas and cheeseIMG_1974IMG_1984


Baked Arancini

A few years ago, I met a friend for happy hour at a Portland restaurant that served arancini. I had never had it or even heard of it, but I immediately fell in love with those little fried balls of risotto. Arancini is said to mean “little oranges” in Italian and originated in Sicily. I’ve tried them at a few different places and vowed to try making them myself someday. I even asked my mom who is part Italian if she ever had them or possessed some ancient family secret recipe, but she had not and did not.

So while planning an upcoming trip to Italy which includes a stop at the world’s fair Expo Milano 2015 – ironically advertised with the theme “Food is Life!” – I also started researching different arancini recipes just to see how common they were and different variations. Although they are traditionally fried, I didn’t want the mess so I baked them in the oven. They turned out just as delicious and lighter tasting than the heavier fried version. They do take a little bit of time, but it’s a great way to use up leftover risotto if you have any. Buon appetito!

Mushroom Risotto

(3) 14-oz cans low-sodium chicken broth

1 oz. dried mushrooms (a mix of porcini, crimini, shiitake, and oyster is delicious), cut into small pieces OR 2 c. finely chopped fresh mushrooms

1 large shallot, finely chopped

1 tsp. finely chopped garlic

1 T. olive oil

1 c. uncooked arborio rice

1/2 c. dry white wine such as chardonnay

1/2 c. fresh grated 3-cheese blend (parmesan, romano, asiago)

freshly chopped basil and/or thyme to taste

sea salt & fresh ground pepper to taste

Put the rice in a strainer over a large glass bowl or measuring cup. Pour the broth over the rice to rinse the starch off. Microwave the broth 2-3 minutes until hot, then add in the mushrooms (if using dehydrated ones) and set aside.

In a large deep frying pan, heat the olive oil, onion & garlic over medium heat until soft and slightly browned, stirring frequently. Carefully add in the rice (watch out for popping!) and wine. Cook it 2 minutes, stirring continuously, then reduce heat to medium. Strain the mushrooms out of the broth and set them aside.

Gradually add the broth to the rice mixture, 1/2 cup a time until it is absorbed each time and before adding more. With the last portion, add in the asparagus and mushroom pieces. Cover and cook 8 minutes, stirring occasionally to keep from sticking. When all the liquid is absorbed and mushrooms are tender, remove from heat. Stir in the cheese, and salt and pepper to taste. Spread in a shallow dish and refrigerate until cooled. Can make this the day before making the arancini.

Arancini

Risotto (recipe above or your own favorite version)

1-1/2 c. Italian style Panko bread crumbs

3 eggs, lightly beaten

1-1/2 c. flour

Spray olive oil

Fresh mozzarella, cut into 1/2″ cubes

Marinara sauce

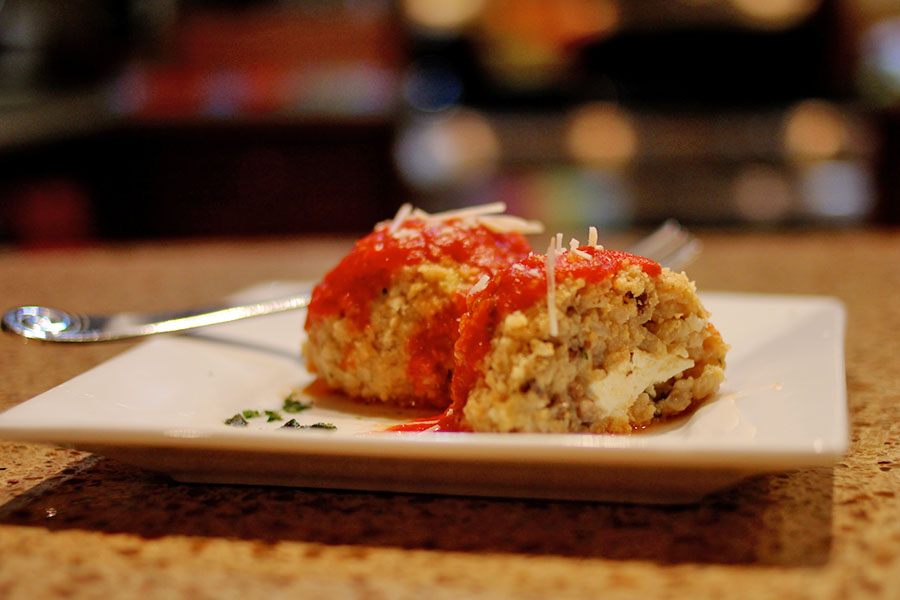
Line 2 cookie sheets or baking pans with parchment paper and preheat oven to 350 degrees. Place the panko, beaten egg and flour all into separate shallow bowls. If being served as a main dish, use an ice cream scoop for approximately 3″ rounds. If being served as an appetizer, then a smaller scoop will make approximately 2″ rounds. Wet your hands with cold water or use gloves, then form the chilled risotto into small balls with a piece of mozzarella in the center. Roll in the flour, then the egg, then the panko, being sure to coat the entire piece and set on the baking sheet. Repeat until you’ve used all the risotto. Spray the arancini with the olive oil spray and bake approximately 20 minutes or until crispy. Warm up the marinara sauce and drizzle over the arancini just before serving.

If you love these and want a few more variations to try, click here.

arancini IMG_4984


New Year’s Day Burgandy Beef & Noodles

Even though I can find any recipe or ingredient idea online now, there’s still something I just love about thumbing through cookbooks. I have some from my mom and grandma that have their handwritten notes in them, and a few other church or civic group compilations that are my go-to favorites. Recently, I was browsing through them on a cold winter weekend and one recipe caught my eye. I bought most of the ingredients for it (except two that I couldn’t find, so I decided on substitutes), and kept them a few days until I had time to cook, which just happened to be a lazy New Year’s afternoon…hence the new name. I changed some of the quantities and ingredients and used my new Le Creuset pot. It turned out amazing, and the house smelled like I had been cooking all day!

New Year’s Day Burgandy Beef & Noodles

2 lbs. cubed stew beef

23 oz. (family size) can cream of mushroom soup

1/2 onion, chopped

1 tsp. beef bouillon granules (or 1 cube)

1 pkg. Italian dressing/seasoning mix

8 oz. can sliced mushrooms

1 c. Cabernet Sauvignon wine or beef broth

1 pkg. egg noodles

Stir together the beef cubes, soup, onion, bouillon and dressing mix. Lightly grease a large covered casserole dish and pour the mix in. Cover and bake at 325 degrees for 3-4 hours or until the beef is very tender. At the end, add the mushrooms and wine or broth and return to oven for 10-15 minutes. In the meantime, cook the egg noodles according to directions. Drain, then stir into the beef mixture and serve!

Note: Try this in a crockpot if you’re going to be out and about a few hours (add the mushrooms, wine, and noodles just a few minutes before serving).

Mushroom & Asparagus Risotto

My original idea for this blog was to taste amazing food in restaurants and then try to simplify and replicate it at home. A few years ago, I had the most amazing asparagus & mushroom risotto at a friend’s wedding reception in beautiful Oregon wine country. I’m not even sure who the caterer was, but ever since then, I always order this dish if I see it on the menu, but none has ever compared. By combining a few recipes I found online along with a few special tips to make the risotto extra creamy, I now present you with my favorite version that is even better than I remember from the wedding reception! It makes a great small, filling meal or a wonderful side dish as well.

Mushroom & Asparagus Risotto

1 lb. fresh asparagus

(3) 14-oz cans low-sodium chicken broth

1 oz. dried mushrooms (a mix of porcini, crimini, shiitake, and oyster is delicious), cut into small pieces

1/2 cup finely chopped onion

1 T. olive oil

1 c. uncooked arborio rice

1/2 c. dry white wine such as chardonnay

1/2 c. fresh grated parmesan cheese

black truffle sea salt (regular salt also works) & fresh ground pepper

Clean asparagus and cut off any tough ends. Cut into 1″ sections and set aside. Put the rice in a strainer over a large glass bowl or measuring cup. Pour the broth over the rice to rinse the starch off. Microwave the broth 2-3 minutes until hot, then add in the mushrooms and set aside.

In a large deep frying pan, heat the olive oil and onion over medium heat until soft and slightly browned, stirring frequently. Carefully add in the rice (watch out for popping!) and wine. Cook it 2 minutes, stirring continuously, then reduce heat to medium. Strain the mushrooms out of the broth and set aside.

Gradually add the broth to the rice mixture, 1/2 cup a time until it is absorbed each time and before adding more. With the last portion, add in the asparagus and mushroom pieces. Cover and cook 8 minutes, stirring occasionally to keep from sticking. When all the liquid is absorbed and asparagus and mushrooms are tender, remove from heat. Stir in the cheese, and truffle salt and pepper to taste. Serve immediately (in warm bowls is best!).

For leftovers, refrigerate overnight.  Reheat in the microwave or take a scoop of the risotto and press into a patty. Coat with panko or bread crumbs and fry in a small amount of hot oil until crisp.

asparagus & mushroom risotto


German Potato Dumplings


I first had a knödel (potato dumpling) when a friend’s mom who was born and raised in Germany made them as an accompaniment to rouladen (German beef rolls). She used a ricer – a kitchen implement I had never seen despite my family being German, and potato farmers! It looks like a large garlic press and can be easily found online or at kitchen stores. It makes the potato dumplings just the right texture.

When researching knödel a bit online, I found many different names, recipes and variations from Europe including sweet dumplings with fruit filling, some using bread in the dough, and others with meat fillings. There was also a lot of debate about the best type of potatoes to use, adding other ingredients to whiten them or make them hold together better, and using cooked vs. raw grated potatoes. The recipe below is what I use based only on watching someone else make them. Normally, I use croutons as the center, but at this time of year, it’s a good way to use up a little bit of leftover stuffing. Try these for Thanksgiving dinner – they’re delicious with any kind of gravy or just butter on top. You can make them ahead of time and then just reheat them right before dinner time.

Potato Dumplings

6 medium russet potatoes

1-1/2 c. flour

2 eggs, lightly beaten

Croutons or leftover stuffing

IMG_0036Wash the potatoes and put in a large pot. Fill with enough cold water to cover the potatoes by 1-2” and a teaspoon of salt. Bring pot to boil and cook potatoes until tender all the way through, approximately 40-50 minutes. When done, drain off water and slightly cool potatoes so that you can handle them. Remove the peels, which should easily come off with the help of a paring knife. Put the potatoes one at a time into the ricer and squeeze into a large bowl with the flour in it. Make a well in the center of the potatoes and put the eggs into the middle. Slowly work the flour and egg into the potatoes until well mixed, being careful not to overwork the dough or it will be chewy when cooked.

Lightly flour your hands and take about ¼ cup of the dough. Form a little bowl with it, add a tablespoon of the stuffing or croutons (2-3 small or 1 large) in the middle. Take another ¼ cup of dough and press it on top being sure to seal all around and form into a ball. Lay on a cookie sheet covered with wax paper while finishing the rest.

In a large pot, bring water to boil and with a slotted spoon, slowly lower in four dumplings at a time. Boil until the dumplings start to float at the top, about 3-5 minutes. Remove from water, drain slightly, and set aside. Repeat until all are cooked. Serve warm with gravy or butter.

Makes approximately 12 tennis-ball sized dumplings.

IMG_0040IMG_0042IMG_0045IMG_0047